Showing posts with label woodmaster woodworks. Show all posts

Friday, September 23, 2016

Feminine, Classy Bedroom

This bedroom pictured below needed a major upgrade! Woodmaster Woodworks was there to help. The owner wanted to do a shiplap accent wall where the bed goes; we LOVE shiplap, so we were definitely on board. The color is a grayish-blue and it truly just gives the entire room the coziest vibe, and makes you want to lay in bed all day and watch Netflix! The whole feel is very serene, and that's exactly what your bedroom should be - it should be a retreat. 


Now, this photo gives you a closer look at what we did to the owner's bed side furniture. The night stands were stained to begin with, so we decided to paint them a similar color to the shiplap wall, and give it a distressed look. The end result is just fabulous; they look brand new but homey at the same time. The homeowner's decorations really tied the whole look together. The delicate pinks with the crisp white comforter makes us want to move right in! 


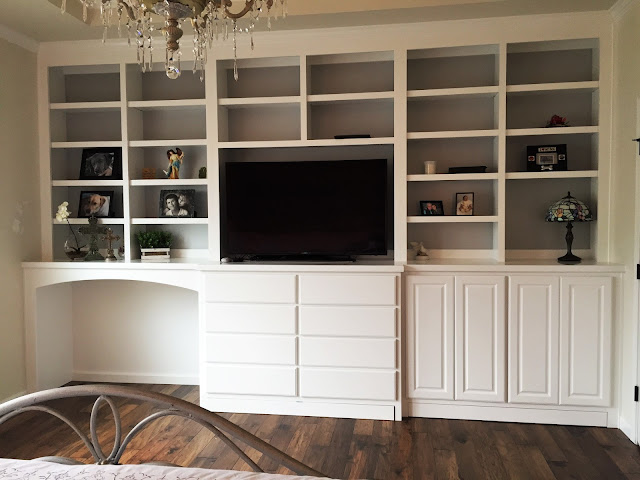
Switching sides: this is the view from the bed. Woodmaster Woodworks created this custom built-in unit for the TV, plenty of shelves, and wait for it.... a dog crate space! Yes - a built-in space for the homeowners dog crate. We absolutely love this idea because now the crate is not sticking out like a sore thumb, and you won't trip over it anymore! Custom cabinetry and carpentry is key if you really want the end product to look original to the home. You cannot even tell that this wasn't built-in from day one. Thank you for reading and we hope you enjoyed! 


Friday, June 24, 2016

Add Trim & Molding To Your Remodel


Hey guys! Are you considering remodeling your house or even just touching up an old room? If so, DON’T skip out on adding trim and molding! I've put together some tips and photos by Woodmaster Woodworks to help you get ideas. When remodeling, it is important to add these elements to the space because many older homes do not have enough trim, or any at all. By adding trim, molding, baseboards, wainscoting, or a trey ceiling to a room, it comes to life. (and into this century!)


Everyone deserves to have that WOW factor in their home, and the photos here definitely have it. A room can go from looking like a dingy box, to a very elegant room with the right amount of detail and trim. Adding something like baseboards may not seem like a very drastic change, but once it’s there, you will wonder why you didn’t add it earlier.


Remodeling a house or even a room is tons of work! We don’t want you to forget to add some of the essentials that will truly transform the look. The amount of depth trim gives a room is substantial, so consider doing some of the things in these photos by Woodmaster Woodworks for a more polished final look. Happy remodeling!

Thursday, January 29, 2015

Refinishing Laminate Cabinets

Want to redo your kitchen cabinets without spending a fortune? I know the feeling. I moved into a house that was screaming 1985 every time I walked into a kitchen or bathroom. So, being a penny pincher, I turned to the internet for affordable options that would give me a better look. The biggest challenge that I faced was the material. My house has laminate counter tops and cabinets - which you can't just paint or stain. Here's my step-by-step guide to doing what I did. I only spent about $300.00, and that includes all of the hardware, paint, drop-cloths, etc. You may already have some of these materials at your disposal.

1. Decide the color choice for your new kitchen/bathroom. 
Keep in mind, if you have white cabinets and very little sunshine, that the color could really change the mood of your room and make it much darker. Also, it's terrible to have to get half way through your project and start over because the color isn't right...not that I did that more than once...


2. Clean your cabinets.
I used hot soapy water to clean the dirt off of the cabinet doors. We also had some issues with mold inside our cabinets due to a water leak, so I made sure all of the cabinets were cleaned inside and out with mold spray.


Before
 3. Take down the doors
This is a surprisingly difficult process if your doors have been up there for a long period of time. Don't forget to take the drawer fronts off - otherwise the whole set up may look funny. The clutter can be overwhelming, but I chose to see it as inspiration to finish faster! **If you have as many doors and drawer fronts as I do, you should probably write on the inside of them where they go, that way you don't spend extra time trying to figure out where they go when hanging them back up.**


4. Sanding Time
This is so much fun. At least pretend, because you have a lot to do! Sand every door, drawer front, and face frame. Make sure to get all of the edges/sides so that the paint wont chip. Don't peel the laminate off if it's stuck on there pretty well, otherwise you may have bumpy paint.


If the laminate is peeling off of the boards, this step is the most important. Take your time and make sure that the surface is completely smooth. You may need to apply a thin layer of putty to the door if it's really rough, that way you don't sand into the door too deeply. You want the surface to be as smooth as possible, otherwise every little imperfection will show in the paint job. 

It's best to do this outside, otherwise you'll have very dusty furniture. You may also want to wear a mask because if you have as many doors to do as I did, you'll be breathing in a lot of dust. 

5. Paint Party
Time to grab your rollers and get to painting. Depending on how your painting your project, keep in mind that there are rollers specifically made to paint cabinets. These are very helpful if you're not doing a design or if you just want a really good base coat. You don't need any special paint finish because you will be painting a sealant on top of the paint, so get whatever is cheapest. The only thing you should care about at this stage is the color!


Make sure to go in the same direction each time you roll your paint, otherwise you will be able to see lines. Also, it's very easy to mess up the edges while painting because many laminate cabinets have round edges at the tops and bottoms so there is no stopping point when painting, so make sure you go completely under the door if that's the case. Make sure to use thin, even layers. I recommend doing at least 2 layers of paint, I did 3 on my cabinets. I also had paint/primer in one, so if you don't buy that type of paint, you should probably use a primer, especially if you're going from dark to light or light to dark. Be sure to read the label on the paint can and give it sufficient time to dry and cure between coats. Otherwise it wont dry or it will get bumpy.


I'm not sure how much space you have to paint, but this is the only system that worked for me (space-wise). I didn't want the paint to get everywhere, but I also didn't want what I've painted to get smudged, so I placed each door on a ladder so that the paint wouldn't get messed up and I could paint the edges at the same time.

6. Seal It
 This is the most important step. Don't forget to seal your doors. I highly recommend using Johnson's Water Seal on your cabinets because it's nearly impossible to scratch. I have redone my bathroom cabinets and my kitchen cabinets, and so far nothing has scratched or chipped! This is exterior, oil-based sealant, so be sure to purchase the proper brushes for the job. I couldn't find rollers for oil-based paint, so I had to use a brush. The finer the bristles the better - it makes for a much smoother finish. Be careful in selecting your sealant because many of them are tinted and it can throw off your paint color. You can pick any finish - I chose satin and I love it!


I applied two coats on my cabinets just to be safe. The key to a smooth sealant is to make sure your brush/roller is completely saturated. If there is any beading on your doors, it will dry that way and give a texture that you don't want. Don't forget to let it cure between coats or before hanging. I waited at least 24 hours between coats, usually 48 hours (unless it was raining). If you don't, you risk scratching and smudging your work - and at this point it's worth the wait not to have to redo them!

7. Pick your Hardware
This is where most of my budget went. I spent about $150 on hardware. To me, this was completely worth the cost because it gave my cabinets a whole new style. Depending on what hardware you choose, the price can be much higher or lower than mine. I chose knobs and pulls that were between $3.00 - $3.50 each.


Installing the hardware was tricky because it's very difficult to drill evenly into plywood. I ended up making a template out of some old cardboard and using that to guide me in the installation process.

8. Hang the Cabinets!
 This is the most fun because you get to see all of your hard work pay off!


Tuesday, November 25, 2014

Top 9 Thanksgiving Hacks


There is nothing like the thrill of Thanksgiving, like trying to cook a four-course meal for twelve people in your kitchen that usually only serves four people - am I right? Ok, maybe thrill isn't the right word. Whether you're excited, panicked, terrified, or ready to call the Chinese restaurant for take out, here are some tips to help reduce your stress and make the most of your kitchen.

1. DIY Roasting Rack
No roasting rack? No problem! You can easily make your own roasting rack with tin foil or vegetables. To make the rack with tin foil, simply roll tin foil into a 1/2" thick line, and twist into a spiral shape to fit underneath the turkey. No tin foil? Try cutting some extra vegetables like onions (halving), carrots (peeling) and celery and line the bottom of the pan. The vegetable option gives added flavor to your turkey. 


2. Copy/Print your Recipes & Tape to Cabinets
If you are anything like me, I lose my recipes at least 14 times before I finish cooking the dish. Save yourself the hassle of searching for lost recipes, or trying to figure out what they say underneath the layers of spilled food by taping them to your cabinets. For the handwritten ones, or recipes in books, you might want to make a copy before taping them. Taping recipes also helps create "stations" in your kitchen when you have people helping you cook, so that nothing is forgotten and everyone has space.

3. Mashed Potatoes from the Microwave
Need extra space on your stove? Don't have time to boil potatoes? Use your microwave! You can microwave your potatoes instead of boiling them and it will save time and space. Microwave 4 medium russet, yukon gold, or white potatoes (6-8 red potatoes) for 8 minutes. Then, continue with your favorite mashed potato recipe! 

Bonus hack: For fluffier mashed potatoes, add baking powder when mixing!

4. Use Coolers/Ice Chests for Additional Refrigerator Space
 "Mom, there's not enough room in the fridge for the green bean casserole!" How many times have we heard that phrase, or something similar? Make more room in your refrigerator by putting some items in coolers/ice chests. For added ease, you can assign different coolers with purposes, such as desserts, appetizers, side dishes, etc. 


5. Slow Roast your Turkey Overnight to Free Oven
They say the smell of turkey makes you sleepy right? Get a good night's rest with the smell of turkey on your side by cooking the turkey as you sleep. Since it takes so long to cook a turkey, you can save yourself a few Thanksgiving Day headaches by cooking your turkey the night before. Your turkey will be fall-off-the-bone tender and juicy.

You can use any family recipe to prep the turkey, then use this little guide for baking a 20 pound turkey: 
Place turkey, breast side down in rack in roaster. Bake 1 hour at 350 degrees. Turn turkey over; reduce oven temperature to 200 degrees. Bake uncovered without opening oven door for 10-12 hours. 


Bonus hack: Use warm chicken broth to bring it back to life if it gets cold, by pouring it over the turkey. This is also a great tip for dry turkey.

6. Prevent Pie Crusts from Burning with Tin Foil 
Don't you just hate it when you make a delicious pie from scratch and the edges of the crust are burned? It just burns me up...ba dum bum tss. To prevent such catastrophes from happening, simply wrap the edges of the pie in tin foil, leaving the center open to cook. Nothing else will change, just the edges!


7. Grate Frozen Butter for Dough
The biggest secret to fluffy and delicious biscuits is the cold butter. But boy is it a pain to have to cut into the dough! Save yourself some time and energy by grating frozen butter into your dough! This is also a great alternative to if you don't have a pastry knife.


8. Prep - Grocery Lists & Veggie Chopping Ahead of Time
You can budget time and money a little better by planning ahead. Plan out the dishes, recipes, grocery lists, and time in advance. 

By planning your menu early, you save yourself from those last-minute trips to the grocery store on Thanksgiving Day and get the added benefit of hitting sales on certain items by knowing you need them ahead of time. 

Chop early! There is so much prep work involved before making most dishes this holiday season, so relax a little by doing the leg work a day or two in advance. You can even put the chopped veggies/ingredients into separate zip lock bags with the amount written on the outside so you can just toss them into your pan on Turkey Day! For example, if your stuffing calls for 2 cups of onions, chop the onions, put 2 cups in a bag and label it "2 Cups - Stuffing". This is much better than trying to sew finger tips back on after dicing too quickly on the big day.

9. Use Slow Cookers to Keep Sides Hot
Instead of trying to overwhelm your poor oven on the busiest day of the year, cook your side dishes early and use a crock pot/slow cooker to keep them warm for hours! This ensures that your food will be served hot, without having to shove everything in your oven 15 minutes before dinner is served. 


I hope you are able to use these tips to have a stress-free Thanksgiving! 


Monday, November 10, 2014

Reusing to Redesign

Tired of looking at the same ol' same ol' in your home? Me too! But sadly, redesigning the entire house is way out of budget! Here are some tips to help redesign your home without breaking the bank:

1. Rearrange the furniture
Sometimes you can rearrange the furniture that you have in each room to make the space feel new again. However, it can sometimes surprise you to see what you can do by pulling from throughout the house. For instance, take a chair from your living room and swap it with one from a bedroom or game room. 


2. Refinish items
Instead of buying new furniture or knick knacks, try refinishing or painting them. You can bring an old 90's frame up to date with a simple coat of paint! Plus, painting some of your decor will bring consistency to your room. 


3. Change out your Pictures
Sometimes the tiniest details can bring new life to a room. Experiment with changing out pictures in your picture frames, or changing up your wall art. If you want to get crafty, you can always make your own art out of other household items, or try your luck at a flea market for some unique, inexpensive art. 

4. Paint
Paint is cheap and can make a big difference. Try painting just one wall or the whole room to give your space a whole new feel! 

For more tips, questions, or help with your design, please contact Woodmaster Woodworks to help make your house feel like home.

Thursday, September 11, 2014

What is this Beautiful Room II?

Work done by Woodmaster Woodworks

For those following Woodmaster Woodworks previous blog post, you are aware that I am following up a small series on decoding interior trim architectural terms that break down a beautiful room. On this post, I have taken another beautiful room with different options than the original post to illustrate more alternatives to incorporate into your home.

French Doors

French doors typically refer to a pair of doors but can be  single. They are a light weight construction door that is primarily composed of glass. The pair in this beautiful room is called a 15 light, referring to the number of panes or glass boxes in the door. These French doors are also adorned with casing trim as previously described on the original post. Coming off the doors, are another style of beautiful wall panel design that again was described in more detail in the previous post.

Arch


An arch is a structure that forms an entrance opening in a curved, pointed, or square shaped design. Not only does it provide structure for support above it, arches offer a timeless classic beauty. Like all other divisions of interior trim, arches offer many different sizes, styles, and adornments in addition to the shape options. The beautiful room picture above shows a traditional style small curved arch with casing. Other examples of arches and additional trim options are pictured below.
Work done by Woodmaster Woodworks


Work done by Woodmaster Woodworks

The first and second arches are large arches adorned in different trim details but both beautiful. The last arch has recessed panels inlaid into the arch for even more added beauty.

Coffered Ceiling

The last and most stunning part of this beautiful room (in my opinion) is the coffered ceiling. A coffered ceiling is a ceiling that has a recessed panel appearance in multiple box shapes. They are typically square, rectangle, or octagon. They differ greatly in appearance from a tray ceiling that was briefly touched upon in the last blog, which is an inverted appearing ceiling with a solid, universal design rather than the coffered multiple box design.

Work Done by Woodmaster Woodworks  
Work Done by Woodmaster Woodworks

All of the pictures above are custom ceilings done by Woodmaster Woodworks showing various options for coffered and tray ceilings. The first 3 pictures are coffered ceilings and the last two are tray style ceilings. The first picture illustrates a multiple shape and size coffered design with two tone paint to add depth to your ceiling. The second coffered ceiling shows elaborate trim detail encompassed into a single paint color ceiling. The last coffered ceiling pictured is a flat style design in two tone paint to highlight the ceiling design. Both Tray style ceilings shown are the more layered style. The first picture having a decorative trim inlaid within the inner border of the recess and the second has multiple layers offset with two tone paint colors to add more depth and a paint wall match. Which ever style of custom ceiling and options you prefer to incorporate into your beautiful room, the end result is absolutely gorgeous!

I hope both Beautiful Room blogs have helped to clarify some terminology but most importantly give you inspiration for your home. Regardless of which options appeal to you from both blogs, all are beyond stunning and truly sets any room of your home apart from any other.

We welcome all comments here and our Facebook page on this blog or any inspired home ideas you would like to see on an upcoming blog. Thank you for continuing to follow us and our blogs.

If you missed the last "What is this Beautiful Room?" here is the link... http://woodmasterwoodworksinc.blogspot.com/2014/08/what-is-this-beautiful-room.html

If you are in our area and interested in a free in home estimate, visit our website at www.woodmasterwoodworks.com to schedule a quote or see more amazing photos of work done by Woodmaster Woodworks!

Also, more Beautiful Rooms and more amazing Woodmaster Woodworks Custom Carpentry and Cabinetry Creations pictured on our Pinterest page at http://www.pinterest.com/wmww/

Follow our Facebook page to stay up to date at https://www.facebook.com/WoodMasterWoodworksINC?ref=bookmarks


Thursday, August 28, 2014

What is this Beautiful Room?


Work done by Woodmaster Woodworks

Have you ever seen a simply glorious room or house and you wondered what is this or how did they do that? Maybe even thought, what do I call this to be able to look for it or a specific company to incorporate that into my own home? Well, I have often wondered all this- especially working here at Woodmaster Woodworks- I am mystified almost daily by their creations. So, I thought now would be a good time to take the blog back to a beginning with some broad terminology breakdown for your home's interior carpentry (not to boring, I hope) and maybe even follow up the next few blogs delving into certain rooms or segments further. With the blogs opening picture of this beautiful room, I am breaking down the woodworking terminology you will need to incorporate any of this rooms beauty into your own home but I will also add more pictures of other rooms or trim to help illustrate the definitions along the way.

Casing

The architectural definition of this is the exposed trim molding around doors or windows, it can be flat or molded. Casing comes in many different options from size to details and can really highlight your windows and doorways. Most homes built today have some form of casing, even if it is just the more cost effective and traditional styles.

Work Done by Woodmaster Woodworks 

In the picture above, the window casing surrounding all sides of the trio of windows helps to make the bay window in the dining area the stunning focal point of this room.

Crown Molding

Crown Molding is the molding that tops or "crowns" a surface or structure, usually referring to the molding used at the top of the walls where the ceiling meets the wall or crowns the wall. Again, like casing, crown molding comes in different options of wood species, size widths, paint versus stain, and detailing so there are many options. Since it is such a beautiful and decorative trim molding, it is commonly used for other purposes, as with the "crowning" of structures. Due to this, some of our custom built-in projects are adorned with crown molding. Crown is commonly used in more mid range to higher end homes today but it is virtually impossible to walk into a room, even a simple one, trimmed with crown molding and not take notice. 


All of these pictures are various crown molding trim, work done by Woodmaster Woodworks. The last photo is a custom built-in illustrating the use of crown molding at the top of the unit with keynote details to greatly enhance the beauty of this customers finished product. Also, the very top right corner of this last picture shows crown molding at the ceiling in the background.


Chair Rail

Chair rail is the railing that goes horizontally around a room traditionally it was installed 3 feet up from the floor to protect the walls from chairs and other furniture causing damage to the walls. Today it is used strictly for its beauty and to help add a separation to your room for color or wall panel design.


The pictures above all show various uses for chair rail. The top picture is a close up showing detail of the chair rail topping the panels, the second picture shows chair rail topping the panels at a distance as the last part of the white before color begins. The last picture is an amazing, unique, and gorgeous way to incorporate chair rail by building a custom stair case handrail. All work was again done by Woodmaster Woodworks.

Ceiling Medallion

 A Ceiling medallion is exactly what is sounds like, a typically circular piece of material that goes on the ceiling under a fixture for decorative purposes. They have many different designs, sizes, colors, materials, and shapes but circle is the most common. They are typically used under an elaborate light fixture or ceiling fan but can be used separately too. The opening picture showed a beautiful, large, lacy style ceiling medallion under the chandelier with a standard ceiling. The next picture shows another style of medallion, also circular but this one is set into a tray ceiling that is defined as a rectangular architectural feature recessed or inverted. Tray Ceilings have a layered, cut into appearance with intricate trim details as shown in the same picture as the ceiling medallion below. They are another beautiful option that I may delve more into on my next blog.


Panels

The last part of our beautiful room from the beginning picture is the wall panels. For many of us, the idea of wall paneling or panels paints a horrible picture in our minds of hideous fake panels that made a room darker or did not justify it. Fortunately for us, those days are gone and we are back to the antique or historical look that has always been breath taking and classic. Panels offer many options for design, style, color, and more. Regardless of what options appeal to you, they are all simply stunning and set any room apart.


All three pictures above show various panel styles, all different, all gorgeous. The first is a wainscoting panel in white, the second is double stacked panels, and the last is an entire room done in stain grade recessed panels. All work done by Woodmaster Woodworks.

I hope this has helped to clear up some custom interior carpentry questions or even open new doors for you. I do plan on blogging a little more on this topic so if you have a room or idea on this or another topic, please feel free to comment back. Thank you for following our blog!